Video lesson for active allies
I know the basics of how to be a legal observer, and how to video. Today, I quote people who know more. The marvelous Teen Vogue published a summary of why and how to do video. I include their advice at the end of this introduction.
Rona’s notes on video:
RE: Safety
Think about how a policeman might respond to you. If they perceive that you are not afraid of them, they may leave you alone. They are too busy to stop you. If they think they can scare you off easily, they will.
Police judge whether they can intimidate you to leave. You are more likely to be able to stay and video if
- Several people are videoing at once.
- Several other people are witnessing with you.
- You are middle-aged or older, white, affluently dressed, and/or male. Some combination of these traits are read by police, generally, as someone they should let be.
- You do not get too close and do nothing threatening.
- You follow instructions if you are asked to step back. Do nothing to justify their use of intimidation tactics on you.
- Your posture is casual, not angry. It is best to look curious and serious.
If you are concerned about being targeted, video in a way that is not obvious. You can hold your camera in the palm of your hand, with your arm down, and get a pretty good shot. This takes some practice. So practice now.
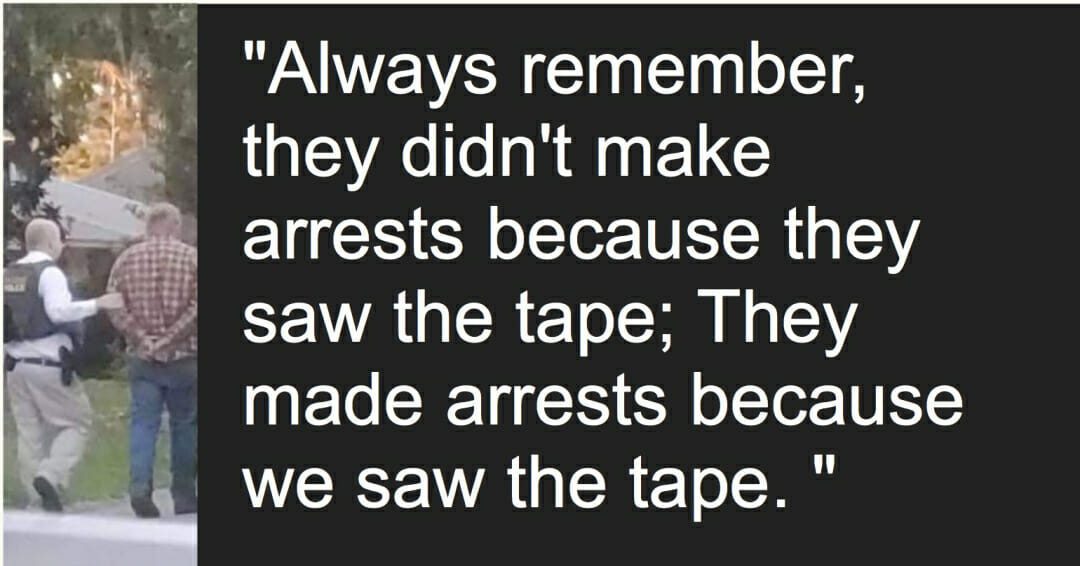
You can video from behind something, so that the police are not aware of you. This was how the video of the attack on Rodney King was made. In 1991, Rodney King was beaten by police, and the beating was filmed and released broadly. 1991, before the internet; the video made the network news. When those policemen were acquitted, there were days of riots. Here are some details.
RE: What to video
One tip that I heard from a criminal defense attorney that I want to add to #4 below. When you video, focus on the police action, not the captive person. Video of a captive person pushing police away or lashing out can be used against the person under arrest. It can be reframed as evidence that they were resisting arrest.
RE: Share your video
“It’s become a deescalation tool. It can help people feel empowered while forcing officers to take a second to reevaluate the situation. There are countless videos showing people asserting their right to film with a sense of security and safety.”
Contacting Massachusetts ACLU is a good place to get advice, if you have a video that may help someone. They are also tracking incidents in other ways.
Update in 2025: The ACLU has stopped maintaining an app where you can send your video. If you take video during an event, send it to a cloud storage or another person who is not at the event. That way, the video is safe if you phone is lost, damaged, or taken.
A picture or video can change everything. I urge you to do what you can. Stand up and be an effective witness.
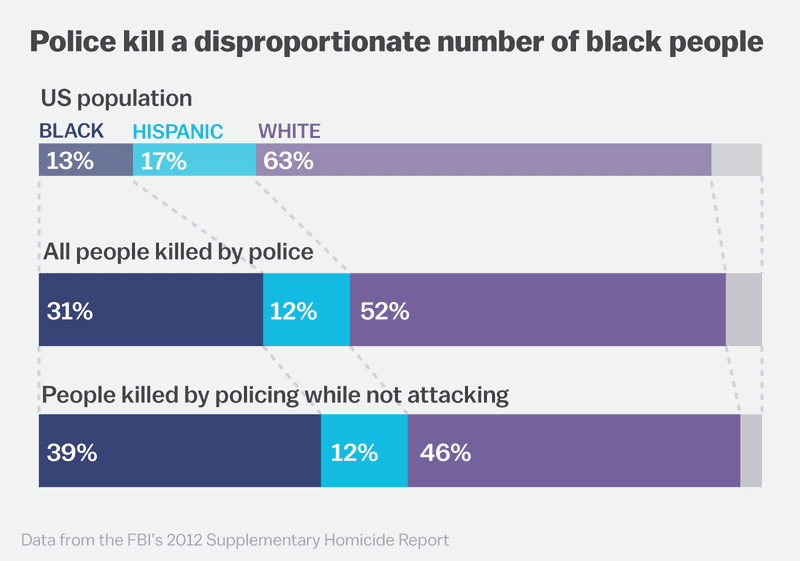
Understand the extent of the American police problem
Why are you taking the risk of recording the police? Take a look at this Map for a current tally of civilian deaths at the hands of police.
Below is part of the Teen Vogue article about being a video witness. The whole article is here.
- Safety first
The most important thing to consider when filming a police interaction is safety — your own and of the person you are filming. Filming or witnessing can escalate a situation, and sometimes bystanders become the target of police violence. The risk to your safety can depend on your identity — your background, race, gender, ethnicity, and so on — so it’s important to think about whether or not you feel comfortable filming before you press record. There are important ways to bear witness even if you don’t film, including standing in solidarity to let the person being targeted know they are not alone, or by taking notes. No footage is ever worth your safety.
- Know your rights
In the United States, you have a 1st Amendment right to record law enforcement in public spaces as long as you don’t interfere — even during COVID-19. But remember:
Whether or not you are interfering is totally up to the police officer in the moment (and later up to a judge or jury), so it’s best to keep at least six feet of distance (or a car’s length) between you and the incident while filming, especially during social distancing.
If the police officer tells you to back up, comply with their orders. You can even film your feet as you’re backing up and say aloud, “I’m complying with orders.”
If the police officer tells you to stop filming, you can assert your right to film if you feel comfortable doing so.
You can stay safe and still film critical footage from a distance, like from a window, balcony, rooftop, or fire escape.
- Prepare before you film
Even though an incident with police might occur without any notice, there are still ways you can prepare to ensure you are safe when filming:
Lock your phone with at least a six-digit passcode, not just the touch ID, face ID or pattern lock. For the most part, courts have ruled that you have a 5th Amendment constitutional right to not give up your cell phone passcode during a legal search. But that right is murkier when it comes to touch ID, face ID, or pattern lock, and courts have ruled both ways in the past. So it’s safest to just stick with a six-digit passcode for now.
Set your phone to automatically back up to a cloud service like Dropbox or Google Drive. That way even if you break your phone, lose it, or it gets confiscated for any reason, you’ll still have a backup of the video you filmed (we’ve seen this tactic work before). However, backing up footage to the cloud could leave the data vulnerable to legal requests from the police, depending on the company’s policy.
- Tell a story with your footage
Ask yourself, “If I wasn’t here, what would I need to see to understand what happened?” Focus on details like:
- Number of officers present, uniforms, badges, license plates, and any other identifying markers
- Are the officers wearing masks and gloves? Are they practicing social distancing?
- Are they using excessive force or violence? Are they using any racial slurs or discriminatory language?
- Do they have weapons with them? Are they using them? Have they caused any property damage, ripped clothing, or injuries?
- Try to provide evidence that your footage is real
In an era of fake news and rampant misinformation online, you want to make sure that your footage is as verifiable as possible. To do this:
Film street signs, landmarks, or exteriors of buildings to help determine the location.
Film a clock, phone home screen, newspaper, or something that helps verify the time and date.
It could be helpful to also state the time, date, and location out loud on camera, or write it down on a piece of paper and hold it up to the screen.
You can turn on GPS location services to help verify your location.
Film continuously instead of stopping and starting your camera; this will help fight against claims that footage was edited or manipulated.
- To speak or not to speak
Sometimes it’s most powerful and helpful to stay quiet and let the footage speak for itself, like when the world heard Eric Garner utter his last words, “I can’t breathe.” But adding commentary to your footage can be a great way to help the audience understand what’s happening, especially if you’re unable to film at a close distance. If you decide to narrate:
Stick to the facts. Try not to include any biased or emotional language. This could hurt your chance of the footage being used as evidence in a legal proceeding.
Think like a sports commentator. Focus on time, date, location, i.e., “It’s 3 p.m. and four police officers just approached two women on Fulton Street in Brooklyn. The officers are holding tasers and are not wearing their masks properly.”
If you know the person being targeted, don’t allege anything about their criminal history or immigration status on camera. Something learned during an enforcement might be used against the person in a legal proceeding.
- More filming tips
We’re all used to filming on our phones for fun, but filming for evidence and advocacy requires a little practice. Here are some tips on how to make your videos more valuable:
Film horizontally as opposed to vertically to capture more content in the frame.
Try to hold your shot for at least 10 seconds before moving your phone. This might feel uncomfortable, but lawyers, advocates, and investigators will need to be able to actually see what’s happening in the footage to use it. We often hear from the lawyers we work with that footage is too shaky or moving around too quickly for them to make sense of it.
Use slow and steady pans instead of quick, jerky movements.
Hold your elbows tight into your body, just over your hips (like a natural tripod for your camera). This will help save your arms from getting tired.
- Sharing your video
So you filmed a video, what do you do now? The first thing to do is pause. Take a deep breath. You may have just witnessed a violent or traumatic event, so it’s important to take care of yourself. Wait before you post the footage to social media. Think through a strategy first, or work with a lawyer or advocacy organization to ensure your footage makes an impact. Before you share, ask yourself:
“Do I have consent from the person I just filmed?” Even if you filmed in a public space where people do not have an expectation of privacy, it can be a courtesy to check in with them or their friends/family before sharing footage of a vulnerable moment publicly. In most cases it might not be possible to get consent, but when possible, speak to them before sharing the footage, or give them the footage so they can decide how it’s used.
“Do I need to blur anyone’s face before uploading the footage in order to protect their identity or location?” YouTube offers a free tool for this (watch a tutorial on how to use it here).
“Do I want to share the footage with a lawyer?” If so, it’s best to share a completely unedited version with them. If you make any edits to the footage (including just changing the file name), do so from a copy; otherwise it could hurt the video’s chances of being used in a legal proceeding.
“Do I want my name associated with the video?” Having your name publicly tied to a video can make you vulnerable to aggressions from internet trolls or even the police. After Ramsey Orta filmed the death of his friend Eric Garner at the hands of Staten Island police, he says he and his family became a target of local police harassment. He was eventually arrested on drug charges, and is currently serving a four-year prison sentence. In a Time magazine article that followed up with Orta one year after the event, he expressed regret for not sharing the video anonymously. At WITNESS, we’ve seen it can be helpful to first share your footage with a journalist or advocacy organization so that they can share the footage publicly instead.
“How can I make sure people see my video?” Unfortunately, just posting a video on social media and hoping it goes viral doesn’t usually work, and might not even be the most strategic option. It’s not about how many eyes see the video; it’s about which eyes see the video. To help a video reach the best audience, share your footage with an advocacy organization to support their campaign work and advocacy goals.
“When should I release the footage?” It’s helpful to collaborate with advocates or a lawyer to determine when to release your footage so that it makes the biggest impact. When Feiden Santana waited until the police report was released before sharing his video of a police officer fatally shooting Walter Scott in South Carolina, the video helped combat the official narrative. The police officer was eventually charged with second degree murder.
The ACLU created an app to send video to the state ACLU office. But the app doesn’t cover Massachusetts. They developed it in 2014, because of police brutality. “It’s become a deescalation tool. It can help people feel empowered while forcing officers to take a second to reevaluate the situation. There are countless videos showing people asserting their right to film with a sense of security and safety.”